24.1. Caching PHP-Nuke
As in How to accelerate PHP-Nuke, we ask ourselves the following questions:
Does your index.php, or the other parts of your PHP-Nuke change more often than, say, once in 15 minutes? Maybe not, if you are not logged in.
Do you really need to see a change the very moment you hit the reload button of your browser? For me, if this change is the number of private messages I got, then I might be interested to see the *real* number. But then again, why not the number as of 5 minutes ago? How important is current content for you? How current is current enough for you? 1 minute, 5 minutes, or even 15 minutes?
If you think a little about it, you will realize that maybe it is not absolutely necessary that your PHP-Nuke does all these conections to the database, querying all that data that most probably did not change the last x minutes, each time you display a page.
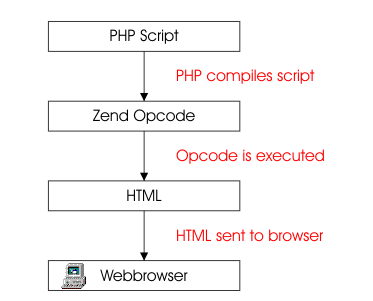
Various tests on optimizing PHP (see, for example, Optimizing PHP) have shown that the biggest time savings in execution time are not achieved through elaborate algorithmic optimization, but rather with an old, well-known technique: caching! The idea behind caching is to avoid repeated execution of the PHP code, by storing the HTML output in a file, as jpcache (Section 24.1.1) and Cache-Lite (Section 24.1.2) do, or in shared memory, as Turck MMCache (Section 24.1.3) does. Optimizers, such as the commercial Zend Performance Suite and the free Turck MMCache, transform the PHP code in an intermediate form, an “opcode” , which they cache - Figure 24-2 shows the way these optimizers work. In the following we will examine them in more detail.
 | Know what you cache and why! |
|---|---|
If you try to cache the whole index.php page even for registered users, you shouldn't be surprised of the errors and you shouldn't blame it on cache. The cache will just cache what you tell it to, for the time intervall you tell it to. Now, suppose that your users get different output on your index.php page, depending on your settings as an administrator (blocks, modules etc.) and their settings as users. Also suppose that you use a caching mechanism, like the ones we will describe later in this chapter, to cache the whole index.php page. Then we can easily imagine a situation where your user A will not get to see what he should see, but what user B was viewing a few minutes ago. In other words, all users will see user's B cached index.php page, with all the wrong links in it, like "Your Account" with user's B data in the link etc. For this reason, it is absolutely necessary to know what you cache and why you cache it! |
 | What to cache for registered users |
|---|---|
If you want to cache content when it is viewed by registered users too, it will make more sense to cache only individual modules or blocks which (see Caching strategy with PHP-Nuke)
|
24.1.1. jpcache

Enter jpcache: jpcache is a lightweight, full page caching system for PHP, thus reducing server load, as pages are generated less often. It dramatically speeds up serving of your pages, by caching page ouput and returning the chached page instead of compiling the PHP one. In the following we will describe jpcache installation, configuration and use (see also How to accelerate PHP-Nuke):
24.1.1.1. Installation of jpcache
Installation is very simple:
Download it from the jpcache download page at sourceforge.net.
Extract the files in the includes directory of your PHP-Nuke. A folder "jpcache" will be created containing all the necessary files. Change to that folder.
Read the readme file.
24.1.1.2. Configuration of jpcache
Edit the $includedir variable in the jpcache.php file to reflect the *full* path to the jpcache files:
// Set the includedir to the jpcache-directory
$includedir = "/usr/local/httpd/htdocs/nuke6/html/includes/jpcache";
Edit the jpcache-config.php file. You basically only need to set the $JPCACHE_TYPE to "file" (remember, we want to avoid database connections):
$JPCACHE_TYPE = "file";
//$JPCACHE_TYPE = "mysql";
//$JPCACHE_TYPE = "dbm"; -- Not yet
then coment the next block (you don't need it, since you *did* specified the $JPCACHE_TYPE above):
// DOH! Strip out this check for performance if you are sure you did set it.
// if (!isset($JPCACHE_TYPE))
// {
// exit("[jpcache-config.php] No JPCACHE_TYPE has been set!");
// }
Just check the configuration options to see what they do, the defaults are O.K. for me:
/**
* General configuration options.
*/
$JPCACHE_TIME = 900; // Default number of seconds to cache a page
$JPCACHE_DEBUG = 0; // Turn debugging on/off
$JPCACHE_IGNORE_DOMAIN= 1; // Ignore domain name in request(single site)
$JPCACHE_ON = 1; // Turn caching on/off
$JPCACHE_USE_GZIP = 1; // Whether or not to use GZIP
$JPCACHE_POST = 0; // Should POST's be cached (default OFF)
$JPCACHE_GC = 1; // Probability % of garbage collection
$JPCACHE_GZIP_LEVEL = 9; // GZIPcompressionlevel to use (1=low,9=high)
$JPCACHE_CLEANKEYS = 0; // Set to 1 to avoid hashing storage-key:
// you can easily see cachefile-origin.
Finally, set the directory for the cached files, preferably outside your web server root, say /tmp/jpcache. Create it, set the owner and group equal to the owner and group of your web server and change the permissions to 755 (rwx-r-x-r-x), or even 750 (rwx-r-x----). Then, enter in jpcache-config.php the absolute path to that cache directory:
/**
* File based caching setting.
*/
$JPCACHE_DIR = "/tmp/jpcache"; // Directory where jpcache must store
// generated files. Please use a dedicated
// directory, and make it writable
That's all! jpcache is now configured correctly.
24.1.1.3. How to use jpcache
To use it, just open the index.php file of your PHP-Nuke and enter the following lines, after the line "require_once("mainfile.php");" (that's important!):
require_once("mainfile.php");
if (!isset($user)) {
  $cachetimeout=900;
} else {
  $cachetimeout=300;
}
require_once "includes/jpcache/jpcache.php"; |
(I have included the 'require_once("mainfile.php");' line in the code above for your orientation).
That's it! You can now tweak the two caching intervalls, 900 and 300 seconds, which apply to non-logged-in and logged-in users respectively. Rethink the questions I asked you in Section 24.1 above. ![]()
A caching intervall of x seconds means that your server will serve you a cached copy of the page, if the cache copy is not older than x seconds. Since non-logged-in users don't get private messages or similar "events", a longer caching intervall is just right for them. Feel free to experiment with these two values, trading actuality of content against serving speed.
Enjoy your new, lightning fast PHP-Nuke!
Oops...I forgot a crucial detail:
You must edit the mainfile.php file too! There, you *must* comment the line
ob_start("ob_gzhandler"); |
as follows:
# ob_start("ob_gzhandler"); |
Otherwise, you will be compressing twofold, once from PHP-Nuke with the above line and once with jpcache through the configuration line
$JPCACHE_USE_GZIP = 1; // Whether or not to use GZIP |
of jpcache-config.php.
The other way round, turning off gzip in jpcache and leaving the ob_start("ob_gzhandler") line uncommented in PHP-Nuke, works too. It may even be better to choose this way, if you use Apache and mod_gzip (a common configuration).
| How to test if caching is working |
|---|---|
You can check if you are doing it right, by trying to cache a block that just echoes the current time. If the cached block displays the same time again and again after reloading (for some time interval equal to the "cache interval"), then caching is working! If it displays the current time (which is changing after every reloading), then caching is NOT working! In this case, most probably no files are being written into the cache directory you specified. Most of the time, this will be a permissions problem: check that the web server has write and execute permissions on the cache directory! See How to accelerate PHP-Nuke. |
24.1.2. Cache-Lite

After reading the above, you may ask yourself if this is all we can do to accelerate PHP-Nuke with caching - and the answer is: of course not!
jpcache (Section 24.1.1) enables caching of the whole page. Remember, we edited index.php to set a different cache expiration time for logged and not logged-in users. The idea behind this was that a user that is not logged in will not have access to most of the dynamic features of PHP-Nuke, thus making caching of the whole page for longer intervalls an acceptable compromise between freshness of content and speed of page generation.
But how about our logged-in users? Wouldn't it be nice if we could at least cache some PHP-Nuke blocks we know they don't change that often? This is indeed possible with Cache-Lite of the PEAR library from PHP.
24.1.2.1. Installation of Cache-Lite
Download Cache-Lite and extract it in the includes folder of your PHP-Nuke installation.
If your PHP does not include the PEAR library, you will need to download download the base PEAR package too. Extract only the PEAR.php file and put it in the same folder as mainfile.php, i.e. your PHP-Nuke base folder.
Cache-Lite needs the PEAR.php file for its error-handling, so you may not notice that you need it until some error occurs. ![]()
If your PHP installation includes PEAR, you don't need to bother installing PEAR.php anywhere - it is already there, at the right place. But if your ISP does not include it, the above PEAR.php will do the trick.
That's all! You are now ready to use Cache-Lite.
24.1.2.2. How to use Cache-Lite
Cache-Lite can easily be used to cache a PHP variable. The easiest application of this is to cache the $content variable of a block that does not change very often - and this is the majority of PHP-Nuke blocks!
To use Cache-Lite in a PHP-Nuke block, open that block in your editor and put the following code (see How to accelerate PHP-Nuke):
// include the Cache-Lite package
require_once("includes/Cache_Lite/Lite.php");
// set some variables
$options = array(
  "cacheDir" => "/tmp/Cache_Lite/",
  "lifeTime" => 900
);
// create a Cache_Lite object
$objCache = new Cache_Lite($options);
// test if there exists a valid cache,
// the <acronym>ID</acronym> will be the basename of the block
$fileid = basename($blockfile,".php");
if ($content = $objCache->get($fileid)) {
// add a message indicating this is cached output
  $content .= "\n[cached with ID=$fileid]";
}
else
{
// do the block's work here... |
after the lines
if (eregi("block-XXXXXXX.php",$PHP_SELF)) {
  Header("Location: index.php");
  die();
} |
What does the inserted code do?
It includes Cache-Lite. Note that in this example, Cache_Lite is a symbolic link to the actual directory the Lite.php file is in. I created this symbolic link myself, as I did not want to put a version-specific directory name in my code - I would have to change it each time I would upgrade Cache-Lite, this way I will only need to change the symbolic link to show to the right directory.
It first sets the path to the cache directory, in this case /tmp/Cache_Lite/. The directory must exist and must be writable and readable by the web server.
Sets the cache expiration time intervall for the object we are going to cache, in this case to 900 seconds.
Creates a cache object with the above settings.
Uses a computed "file id" as a key to identify the cached object (the cached $content variable). I have decided to use the basename of the PHP-Nuke block , i.e. the filename of the block without the ".php" ending, as the key for the $content variable. This way I don't have to change my code each time I insert the above lines in a new block. The $key will be computed automatically and will be the basename of the block file. Since in PHP-Nuke blocks are guaranteed to have distinct names, this is a good choice.
$blockfile is a variable that is computed by PHP-Nuke in mainfile.php, in function blocks():
$sql = "SELECT bid, bkey, title, content, url, blockfile, view FROM ".$prefix."_blocks
WHERE bposition='$pos' AND active='1' $querylang ORDER BY weight ASC";
$result = $db->sql_query($sql);
while($row = $db->sql_fetchrow($result)) {
    $bid = $row[bid];
    $title = $row[title];
    $content = $row[content];
    $url = $row[url];
    $blockfile = $row[blockfile];
The value of $blockfile is then passed through to the individual block: it is passed to function render_blocks() (in mainfile.php again), which in turn renders the block using the blockfileinc() function.
What to do if the cache ID is empty Looking at the blockfileinc() function in mainfile.php, you can see that it uses the functions themecenterbox(() and themesidebox() for blocks that don't have a filename - and, of course, it does not pass the (empty) blockfile parameter. Thus, if you see that the above code for the block prints an empty cache ID, then you will know that you are using a block without a filename (see empty cache ID and Cache-Lite).
The quick solution is to explicitly set the fileid variable to some arbitrary value in you block code. However, you should check to find out why your block does not posess a filename (e.g. it could be an RSS block - we describe these in Section 7.1 and Figure 7-7).
If a valid cached copy of the object identified by the key exists, it is fetched and fed into the $content variable of the block. I issue an echo to print the cache ID (the key) in this case, just for the start, to give me some idea of how (and if at all) this works. Of course, you can comment the echo later.
In case the cache misses the object (or expiration time is over), you wil have to compute $content from scratch. Put your normal code here.
Of course, we are not done yet - after we compute $content in our block, we will want to cache it for future use. ![]()
Thus, after the end of your computations and before you close the block with "?>", put the following to instruct Cache-Lite to cache your $content:
// ...and save it in the cache for future use $objCache->save($content, $fileid); } |
This closes the IF-statement we opened with the previous block of lines. It caches the $content variable in our cache object, using as identifier the file ID we derived from the block's filename. You have to put these two blocks of lines in every PHP-Nuke block you plan to cache, but the work is worth it!
The complete code for your cached block should thus look like:
<?php
if (eregi("block-XXXXXXX.php",$PHP_SELF)) {
    Header("Location: index.php");
    die();
}
// include the Cache-Lite package
require_once("includes/Cache_Lite/Lite.php");
// set some variables
$options = array(
  "cacheDir" => "/tmp/Cache_Lite/",
  "lifeTime" => 900
);
// create a Cache_Lite object
$objCache = new Cache_Lite($options);
// test if there exists a valid cache,
// the <acronym>ID</acronym> will be the basename of the block
$fileid = basename($blockfile,".php");
if ($content = $objCache->get($fileid)) {
  // add a message indicating this is cached output
  $content .= "\n[cached with ID=$fileid]";
}
else
{
  // do the whole work here...
-------> Your original code goes here <-------
  // ...and save it in the cache for future use
  $objCache->save($content, $fileid);
}
?> |
If something goes wrong and your block is not being cached, check the following (How to accelerate PHP-Nuke):
Do you have the PEAR.php?
Where did you install the Lite.php file?
Did you install it in includes/Cache_Lite/Lite.php, as I suggested?
Did you enter the right path to Lite.php in the block you are trying to cache?
Did you follow my example for a cached block above?
If you did, do you have the right path in the line
require_once("includes/Cache_Lite/Lite.php");of that example?
For a more in-depth tutorial on Cache-Lite, see Caching With PHP Cache_Lite.
You can use both jpcache and Cache-Lite together in a cache strategy that caches the whole page with jpcache when a user is not logged-in, but caches the least changing blocks (probably most of them) with Cache-Lite when he is. Such a strategy allows enough flexibility and room for experimentation and brings a considerable acceleration to your PHP-Nuke, without, on the other hand, requiring any access to the internals of your PHP installation - something that you will need, if you want to try the ultimate approach to caching , which we will present you in Section 24.1.3.
24.1.3. Turck MMCache

As we know, PHP is an interpreted language. The PHP interpreter compiles your scripts each time you call them. However, the PHP code itself may not change that often in your scripts. Having to compile the code on each call wastes your CPU's time. That's where the idea of caching the PHP code (and not only the HTML content) comes in (see How to accelerate PHP-Nuke).
The idea of PHP code caching lies in the basis of many commercial PHP accelerators, like
Hopefully, there is a free open source alternative: Turck MMCache, a product under the GPL Licence.
Turck MMCache is a free open source PHP accelerator, optimizer, encoder and dynamic content cache for PHP. It increases performance of PHP scripts by caching them in compiled state, so that the overhead of compiling is almost completely eliminated. Also it uses some optimizations to speed up execution of PHP scripts. Turck MMCache typically reduces server load and increases the speed of your PHP code by 1-10 times!
Download the newest version (currently 2.4.6) from the Turck MMCache download page at Sourceforge. There are precompiled binaries for Windows, as well as source packages for Linux and other operating systems.
Before you rush and download it though, let me bring to your attention that the approach taken by a code accelerator like MMCache requires that you install it as a so-called "PHP extension". You will also be configuring options like the amount of shared memory that you want allocated to MMCache, in order to use it for caching. These steps are normally beyond the reach of mass hosting accounts on ISPs, so you may be out of luck. However, if you own the web server, or have administration access to it, then MMCache is for you - rush to the download page and get it!
24.1.3.1. Installation of Turck MMCache
In the following, I will describe the installation process of Turck MMCache for Linux:
Login as root.
Change to a directory that is appropriate for holding source code. In Linux, this is /usr/src:
cd /usr/src
Extract the package:
tar -xzvf /usr/cdimage/source/turck-mmcache-2.4.6.tar.gz
It creates an folder with all files. Change to that folder:
cd turck-mmcache-2.4.6
Find the place where the phpize program is installed on your system. For this, type:
which phpize
Mine is on /usr/bin, as you can see from the output:
# which phpize
/usr/bin/phpize
so what is before the "/bin" is my PHP_PREFIX. In this case “/usr”. Type the following:
export PHP_PREFIX="/usr"
$PHP_PREFIX/bin/phpize
You get the output:
autoheader: `config.h.in' is created
You should update your `aclocal.m4' by running aclocal.
so you run
aclocal
Now you are ready to create the Makefile with the configure script:
./configure --enable-mmcache=shared --with-php-config=$PHP_PREFIX/bin/php-config
After that, the Makefile is there and you can do (you must be root for the last step)
make
make install
This will finish installation of Turck MMCache on your server.
24.1.3.2. Configuration of Turck MMCache
After installation, you need to configure MMCache:
Open the php.ini file (/etc/php.ini), find the "extensions" section and put the following there:
[extension section] ... various other extensions extension="mmcache.so" mmcache.shm_size="16" mmcache.cache_dir="/tmp/mmcache" mmcache.enable="1" mmcache.optimizer="1" mmcache.check_mtime="1" mmcache.debug="0" mmcache.filter="" mmcache.shm_max="0" mmcache.shm_ttl="0" mmcache.shm_prune_period="0" mmcache.shm_only="0" mmcache.compress="0" ; end of extension section |
MMCache uses shared memory for caching, as opposed to disk space. This is a reason why it is so fast. The mmcache.shm_size option defines how much shared memory (in MBytes) it should use for caching.
Again, you need a cache directory too, which is what mmcache.cache_dir is for. Again, the cache directory should be writable and readable by your web server.
You can read about the other options in the Turck MMCache Homepage. For our purposes, you can leave them at their values as in the example above.
This completes the configuration of MMCache. We still have to talk about its use - but that's easy, see the next section. ![]()
| Turck MMCache on a virtual server | |
|---|---|---|
Question: I am on a virtual server and should not interfere with the other domains hosted there. How do I configure MMCache in this situation? Answer: Compile MMCache and put it into the extensions directory. Configure php.ini to utilize the extension but set mmcache.optimizer, .compress and .enable all to FALSE. Then a .htaccess file (see Section 25.4) in your own webspace and use:
This should do the trick. |
24.1.3.3. How to use Turck MMCache
By following the configuartion steps above, MMCache already works for you: it compiles PHP code and caches it. Whenever a script's code changes, it recompiles it and caches it again. You should already see a noticeable improvement in your response times because of this.
But there is more you can do with MMCache: you can cache a whole page, like with jpcache (Section 24.1.1), or individual parts of them, like with Cache-Lite (Section 24.1.2). Since jpcache uses disk space for caching the whole page, you can replace it by MMCache's functionality, which uses shared memory and could thus be up to 5 times faster. Here's how you do it (see How to accelerate PHP-Nuke):
Open the index.php file and change the code we put there for jpcache (see a previous post) as follows:
require_once("mainfile.php");
if (!isset($user)) {
  $cachetimeout=900;
  mmcache_cache_page($_SERVER['PHP_SELF'].'?GET='.serialize($_GET), $cachetimeout);
} else {
  $cachetimeout=-1;
}
# require_once "includes/jpcache/jpcache.php"; |
As you can see, we commented the jpcache inclusion line and put a call to mmcache_cache_page with the same cache timeout. This will do exactly what jpcache was doing previously - cache the whole page in case the user is not logged-in and leave it uncached in case he is, so that Cache-Lite can cache parts of it. But due to the shared memory implementation, we are going the get an extra speed kick out of it. ![]()
mmcache_cache_page is only one of many MMCache functions you can use in your blocks and modules to speed up things. Some other interesting ones are:
mmcache_set_session_handlers(): install the MMCache session handlers. Since PHP 4.2.0 you can install MMCache session handlers in "php.ini" by
session.save_handler=mmcache
mmcache_cache_output($key, $eval_code, $ttl=0): caches the output of $eval_code in shared memory for $ttl seconds. Output can be removed from cache by calling mmcach_rm() with the same $key. For Example:
<?php mmcache_cache_output('test', 'echo time(); phpinfo();', 30); ?>mmcache_cache_result($key, $eval_code, $ttl=0): caches the result of $eval_code in shared memory for $ttl seconds. Result can be removed from cache by calling mmcach_rm() with the same $key. For Example:
<?php mmcache_cache_output('test', 'time()." Hello";', 30); ?>
There are other uses of MMCache, like its use as an encoder to hide your precious PHP scripts from the spying eyes of competitors - but we are talking open source here, aren't we? ![]()
24.1.4. Caching PHP-Nuke: Conclusion
We have seen three approaches to PHP-Nuke acceleration in the previous sections:
jpcache (see Section 24.1.1) can cache and compress a whole page - on disk.
Cache-Lite (see Section 24.1.2) can cache and compress a whole page or individual PHP-Nuke blocks, modules, variables - on disk (or shared memory too? FIXME: someone please correct me here!).
Turck MMCache (see Section 24.1.3) can cache and compress all of the above, plus can do encoding - all in shared memory!
So which tool is the right one for you?
There are a lot of combinations one could try there and without serious testing it is not easy to answer this question definitely. However, from what we have seen already in the previous posts, we can derive some strategies (see also How to accelerate PHP-Nuke):
If you don't have administration access to your web server, you are left with jpcache and Cache-Lite. Use a combination of them as outlined above, caching whole pages with jpcache and individual blocks/modules with Cache-Lite. It's a strategic decision when to use which one - one you will have to make yourself.
If you do have administration access to your web server, MMCache is the way to go. You can use it to cache PHP code and - optionally - a whole page content or just part of it. Whether you should prefer Cache-Lite for the latter, or decide to use MMCache, is something that probably only tests can show.
Ease of deployment can also play a role: with MMCache, you add a line, with Cache-Lite a whole block of lines, to each PHP-Nuke module or block you wish to cache. On the other hand, Cache-Lite may live up to its name and prove itself to be really lightweight in some (or all) situations. Again, you wll have to test.